Tuesday, 5 May 2009

Things Made


These are the two projects I've made so far from Amy Butler's 'Little Stiches for Little Ones.' I originally made the jumper dress/pinafore because I found the gorgeous Liberty print in my local fabric shop. This was before my cousin let me know that her baby was a boy - hence the switch to the Kimono PJ's pattern and the tractor print. My eldest younger brother loved "tadders" as a baby. He's slightly less fun to make for now as his tastes are pretty dull:

I've just got a copy of Heather Ross's 'Weekend Sewing' and am looking forward to making various gifts ands her summer blouse.

Thrifty Gardening

I've been really impressed by "Thrifty Gardening" by Alys Fowler - one of the presenters on Gardener's World. It's a very timely publication as the country's twin obsessions seem to be GYO and the credit crunch. And even if it weren't with the zeitgeist, no one wants to grow strawberries at £2 something each!
Luckily, I know a number of very keen allotment gardeners and inherited a pile of useful things behind the garden shed from the previous custodian of the garden.
Thus far, I have created a fruit cage to contain the strawberries and fruit bushes from net that came with the property and value plastic clothes pegs:

I also managed to cobble together some netting over the Link-a-board raised bed which came cheap on a newspaper promotion using plastic hosepiping to support it purchased for a pound from the local poundland:

To the left you can see the progress the onions, rocket and Osaka greens are making in the top of the larger bag garden. I'll post an update when I plant the dwarf french beans into the sides of the bag.

Sunday, 19 April 2009

Step by Step Bag Garden

The literature and video from Send A Cow give clear instructions for how to construct a bag garden. Here's the picture of how I made mine (with help).

It all starts with a coarse hessian sack with some gravel in the bottom.


Next, you take a tin can which you open both ends to make a tube. The can is placed in the centre of the sack and filled to the brim with more gravel.
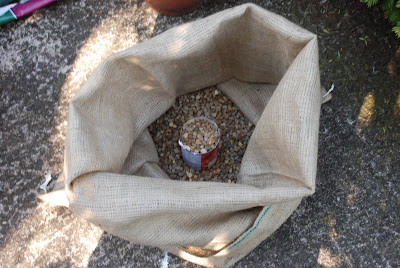


Then you pack the area between the sack and the can with compost (I used a mixture of stuff from our heap and some bought from the ironmonger in the village). Once you are almost level with the top of the can, you wiggle the can up until it is a hollow tube once again, taking care not to pull it right out so that compost can creep into the cylinder of gravel. You fill the can with gravel again and then add more compost around it.


You end up with something like this which is ready for planting. So far I have just planted the top surface of my bag. Later this month, when there is no further risk of hard frost, I will make incisions in the side of the bag and plant dwarf french beans to add to the leaves and onions that are in so far.


Much more comprehensive instructions can be viewed online either through SendACow's website or on their Youtube stream:
http://www.youtube.com/watch?v=Ul0kQ_2lvrE